Today, we are talking WYZE cam v3 window mounts. I will show you how to get rid of those nasty window reflections when pointing your camera through a window. We’ll also checkout the camera footage from 3 different windows.
Here are 2 silicone window mounts we’ll examine today. One is an angle mount and places the camera at a 20-degree angle and the other flat against the glass. Without a mount, placing a camera near or against the window will reveal some reflections. At night we have much more especially when the camera’s IR night vision lights turn on. They are reflected back, right into the camera’s lens and the footage is useless.

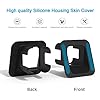


MSAFF Window Mount for Wyze Cam V3/V3 Pro, Angle Tilt (Up/Down/Left/Right), No Screws, No Reflections, Damage-Free, Glass Windows/Doors Bracket Holder Compatible with Wyze Camera V3/V3 Pro - Black
$14.99So, today’s video will show you how we can fix this and make the image better. We’ll test out these 2 mounts and discuss the camera setting in the app to make these mounts even more effective. Then, we’ll do some side-by-side testing, followed by a pro tip at the end, so make sure to stick around for that. As always, links for everything seen here today are in the description below.
Here is a quick intro to the angle mount. It’s made from silicone and fits the v3 cam perfectly. It cost about 15US.
The flat mount. It’s much thicker since it had to support the entire camera from just the front of the device. This one cost about $10US.
Let’s stick these mounts to my first window, and get the cameras configured for the best ‘through-glass’ images. Here at night, the camera’s night vision lights are on. As I place the camera in the window you can see them reflecting back. So, let’s fix that in camera settings.


Wyze Window Mount for OG and v3 Pro
$9.99It’s time to drop in the cameras. The flat mount is very snug and the angled camera fits great too. The third camera will act as our control. There’s no mount on that one, it’s just there as a baseline for our testing. From the outside, here’s how they look. I like the flat mount best since it’s the most concealed, even though it has the largest footprint.
Let’s start off with this comparison. The control camera with no mount is on the top. The Flat mount and, the angle mount are on the bottom. I like this angle mount here because I don’t really care what the sky looks like, I just want to see the deck area. Seems like this mount helps the camera provide coverage of my area under surveillance.
Now looking for glare, the image is pretty much perfect. On the control image, there is a slight hint of the reflection of the front of the camera right here. Let’s fast forward. The mounts seem to be doing the trick here, but let’s continue our testing.
Now at night, we have the cameras Control, Flat and Mount set up and I’ve added a camera to record what the interior of the room looks like. We’ll flick that light on and off a few times we see how it’s impacting all the images and reflections. The control camera is allowing the most reflections over the entire image but especially on the left side. The flat mount is a big improvement over the control but I can see a ghost of my curtains here on the right. On the angle shot, I can see the face of the camera on the right side and a blanket right here and a curtain here on the left.
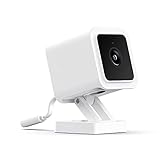


WYZE Cam v3 with Color Night Vision, Wired 1080p HD Indoor/Outdoor Video Camera, 2-Way Audio, Works with Alexa, Google Assistant, and IFTTT
Let’s scan through this long time-lapse with the 3 cameras. There’s a little glare on the control from the camera’s face. As day breaks, the cameras flick over to daytime color mode. There is some lens flare, but no additional window glare. As night starts to fall, the angle mount camera is showing some glare of the camera’s face as well. Just like that, it’s night time again. There was just a flicker of glare since I turned on some lights inside. The control shows the most refection of the 3. The angle, shows the camera’s face a few times. The flat mount was pretty much perfect. Not too bad.
Ok, now we’re going to move the mounts and cameras to a different location. By the way, these mounts stick very well and to clean off the excess tape form the window I used nail polish remover or acetone was the solution for me. Careful using this as it could remove UV protection or tinting on the window. I then used double sided tape to re-mount the cameras.
Here is my next test window. This time I pointed the angle mount upwards to record the sky and maybe some northern lights. Once installed, I closed the blinds and curtains to keep glare to a minimum.
So, what do ya know? Off in the distance there is a lady dancing in the sky. Yes, I lucked into some northern lights on the first night. As for glare, all the cameras are showing a degree of reflection. The angled mount is showing a couple camera faces and some other glare off to the right. The flat mount, just has this line on the right. On the control, the face is very obvious and thankfully, that camera stayed in color mode all night and give us some nice aurora colors. That orange light is something else – on land. As day breaks, those clouds look awesome. I know this isn’t video on the quality of the camera, but that daytime sky looks amazing. I love the positioning of the angle mount here. Now, this second night, I turned off the lights outside on my house and the glare on the mounts isn’t as noticeable. I also forced the cameras to stay in color mode in hopes of catching for auroras, but no luck, just clouds and fog, which make for a noisy image.
From here, we removed the mounts here, to keep an eye on the garage doors. Here is a quick look at the setup. And at night, the glare isn’t too bad but when I turned off my outside house lights, a lot of that glare was removed. My house lights shine directly on the window and with double panes, the light reflects between the panes, back into the camera. I could probably remove more glare by turning off the IR lights on this camera in the corner.
In summary, we updated the settings to turn off the IR and camera status lights. We then compared the footage taken from each mount. I found the mounts definitely made a difference in controlling reflections. These glares can originate from light both inside and out. This doesn’t mean however I’ll be keeping my property lights off at night. The flat mount controlled the glares the best, but I found the angled mount more versatile.
Thanks for sticking around to the end, and for that, I have a final pro tip if using the angle mount. Color the face of the camera black, like this. Then you’ll have even less of a reflection of the camera in the window. Check out the difference of these before and after images. Pretty cool right? Thanks for watching. Please like and subscribe so you don’t miss my home tech DIY projects that you can do yourself.
Auto Amazon Links: No products found.