Hey Guys,
Today we are unboxing, setting up and installing this all-in-one security camera system in a box. It’s a starter kit and costs about $150US and includes 4 wireless cameras.
This is my second review of an anni product so this name and branding may look familiar. The box contains 4 X 720p or 1MP, IP66 weatherproof bullet style wireless cameras. There is also a Network Video Recorder or NVR included in this kit with a 1TB hard drive. Kits are available without the hard drive, and I would recommend getting the device without the hard drive since the included drive is of very low quality and mine failed within a day and the NVR couldn’t see the drive. A 1TB hard disk can store one month of data of continuous recording of 4 cameras. This is a standalone system and no Internet connection is required unless you want remote access. Also, no PC is necessary as the NVR is your user interface into the device. You will need a monitor or TV however with an VGA or HDMI port, especially when setting this up first.


SmartSF 8CH 1080P NVR Outdoor Wireless Security Camera System Video Surveillance Recorder WiFi CCTV, 4Pcs 720P 1MP Weatherproof IP Camera,65ft IR Night Version,Remote Access,No Hard Disk
Auto Amazon Links: No products found.

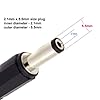

Hanvex HDCQ50 50ft 2.1mm x 5.5mm DC Plug Power Adapter Extension Cable, 20AWG Cord for 12V CCTV Wireless IP Camera, LED, Car, More
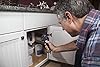
(as of May 14, 2024 22:40 GMT -06:00 - More infoProduct prices and availability are accurate as of the date/time indicated and are subject to change. Any price and availability information displayed on [relevant Amazon Site(s), as applicable] at the time of purchase will apply to the purchase of this product.)Like I mentioned, my included first hard drive failed. Luckily, I had another on-hand so I could easily swap out the drive and reformat it.
By default, all of the cameras are recording continuously, so no setup is required there.
Now is a good time to update the password from blank. Right click and go to System setup, System Admin, User. When done, you won’t get a confirmation, only an error if something went wrong.
Now, let’s add the NVR to my network and the Internet and give it an IP address where it can communicate with my other devices.
The NVR’s current IP address is 192.168.1.144. To match my network, I’ll need to change that 1 to a 0. I’ll also update the gateway to be that of my router; 192.168.0.1. You get a couple of warnings when confirming.
What about if the cameras are close to a network drop?
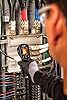
We can connect to cameras on the network if the NVR is on the network as well. I don’t mean connecting a camera directly to the LAN port of the NVR, that doesn’t allow you access to the camera over a wired connection. Let’s connect it the NVR and a camera to the router or a switch which will be connected to a router or modem.
Each camera has 2 ways to connect to a network; wirelessly and through the wired RJ-45 connection and each will have their own IP address. If the camera is plugged in to the network and we navigate to the Video Manager screen, we’ll see this available connection in the first table. The lower table shows you the current connections. Notice the IP addresses of the wireless connections; they use their own internal network to the NVR. The NVR then communicates with your network over the NVR’s external IP address, which I have already updated. You can modify the IP address of the RJ45 camera connections, like I will here. Then in the list below I will add it to the connected devices by telling the NVR to find that camera’s wired IP address and not to use the wireless IP address. Now for a lag test. The camera on the left is transmitting wirelessly to the NVR and the camera on the right is sending data over a hard wired network connection to my network.
Now let’s setup the remote access. That will also make things easier when installing the cameras because we’ll be able to see the placement of the devices on my phone while I’m installing them. The NVR still plugged into an available port on your switch or router with internet access.

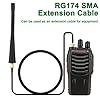

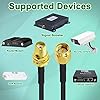


YOTENKO SMA Male to SMA Female Bulkhead Mount Cable RG174 6.5ft/2M SMA Extension Cable SMA Jumper RF Coaxial Cable for SDR Equipment Antenna Ham Radio 3G 4G LTE Antenna ADS-B Dongle Receiver
$6.98
![Anker Unibody Aluminum 3-Port USB 3.0 and Gigabit Ethernet Hub with 1.3ft / 40cm USB 3.0 Cable [Ethernet Port RTL8153 Chipset + USB Ports VL812 Chipset] #1](https://m.media-amazon.com/images/I/41z1OiSln0L._SL100_.jpg)
![Anker Unibody Aluminum 3-Port USB 3.0 and Gigabit Ethernet Hub with 1.3ft / 40cm USB 3.0 Cable [Ethernet Port RTL8153 Chipset + USB Ports VL812 Chipset] #2](https://m.media-amazon.com/images/I/51YzSrBhkeL._SL100_.jpg)
![Anker Unibody Aluminum 3-Port USB 3.0 and Gigabit Ethernet Hub with 1.3ft / 40cm USB 3.0 Cable [Ethernet Port RTL8153 Chipset + USB Ports VL812 Chipset] #3](https://m.media-amazon.com/images/I/31b3x3MJbRL._SL100_.jpg)
![Anker Unibody Aluminum 3-Port USB 3.0 and Gigabit Ethernet Hub with 1.3ft / 40cm USB 3.0 Cable [Ethernet Port RTL8153 Chipset + USB Ports VL812 Chipset] #4](https://m.media-amazon.com/images/I/31jbCXpziZL._SL100_.jpg)
![Anker Unibody Aluminum 3-Port USB 3.0 and Gigabit Ethernet Hub with 1.3ft / 40cm USB 3.0 Cable [Ethernet Port RTL8153 Chipset + USB Ports VL812 Chipset] #5](https://m.media-amazon.com/images/I/51CCkmoUeGL._SL100_.jpg)
Anker Unibody Aluminum 3-Port USB 3.0 and Gigabit Ethernet Hub with 1.3ft / 40cm USB 3.0 Cable [Ethernet Port RTL8153 Chipset + USB Ports VL812 Chipset]
I did struggle with the app and found it clunky and it crashed quite frequently, like when I was updating my password.
Next, we’ll set up the cameras in a few locations wirelessly and review the footage. If you aren’t sure where to install the cameras, check out my video called “Where to install and point my security cameras”. Before attaching them permanently, test out the location first by either just holding the camera in the proposed location or securing it somehow. Make sure to test both day and night. Place all the cameras in their proposed location and make sure the NVR is receiving a strong enough signal to see the footage. You may need to move the NVR around to find the best place when it’s getting a good feed from all the cameras.
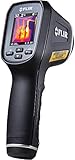


FLIR TG165 Spot Thermal Camera, Infrared Visual Thermometer, Quickly Detect Heat, Accurately Measure Temperature, and Document Image and Measurement
Overall, I am impressed with this entry level security camera system, especially at the given price point. I like how we see the bitrate on the System Setup – Channel Setup – Bitrate screen to give you a good estimate of how long it will take to fill your hard drive. For me, at 1200MB/H, I will fill a 1TB disk in about 800 hours or 32 days. I also like the wireless capability allowing you to install the cameras pretty much anywhere, even in temporary locations if you are going out of town for a few days and they can withstand cold Canadian weather. A good tip is to keep the NVR centrally positioned for best signal. I did struggle at time with the verbiage in the system configuration and the user interface is pretty clunky, like when trying to update the IP addresses. The numbers did not want to be highlighted and then clicked again to open the number selector. Also, when trying to playback video, the date selector would not allow me to go back and select today, the 28th. Exporting video was pretty painful as it took 9 min for a 525-meg file. The app also needs some work to make it stable and connect consistently. Lastly, I didn’t need to do any port forwarding or look into my public facing IP address, which helped keep things simple.