Today we are checking out these outdoor string lights from Lumary. These lights have been on my radar for a year now and I have a few places in mind where we’re going to set these up. They’re smart lights, with built in scenes and fully controllable with your smart phone, right down to each bulb.


Lumary 56FT Smart Outdoor String Lights, RGBAiWW Patio Lights IP65 Waterproof, 15+1(Spare) Dimmable Replaceable LED Bulbs, APP/Voice Control Work with Alexa, DIY Scene Modes for Backyard, Balcony
Again, this lighting set is from Lumary and can be picked up for about $70US + shipping on Amazon or from their own website. We’ll see if these lights are worth it but first, let’s kick things off by looking in the box.
Lumary 56FT Smart Outdoor String Lights, RGBAiWW Patio Lights IP65 Waterproof, 15+1(Spare) Dimmable Replaceable LED Bulbs, APP/Voice Control Work with Alexa, DIY Scene Modes for Backyard, Balcony
Here’s a closer look at the electrical plug. There is a note written on the plug to only use it in a covered GFCI receptacle. Judging by the look of this plug, it’s not weather-proof, so using a covered plugin would help protect it from the elements. Let’s run outside. The horizontal designed plug boxes were a little tight at my house. So is this one horizontal box, it’s very snug. In this vertical configuration, I wasn’t able to plug in the adapter at all. In this case, I would recommend covering the adapter somehow if using it outside, like an external covered box, like this one here. I also have this outlet on the front of my place, and technically it’s covered by a roof and there is pretty low risk of it getting rained or snowed on up here. I’ll add a link for the cover in the description and for everything seen here today.
If we slide down the cord 20 inches (51cm), we have the control box. This is where the brains of the Lumary device are located. The back has little rubber feet and there are 2 screw holes in case you need to secure it to a surface. The rubber button also seems to be of good quality and will keep the rain from leaking in.
The cord length from this controller to the first bulb is 64 inches (163cm). As I mentioned, there are 15 bulbs and the spacing between each light is 39in or 1m. Each bulb consumes a maximum of 1 watt each. The wire is 22 gauge which is nice and thick but if you plan on stringing the entire set of lights between 2 points, a guide wire is recommended. So, yeah, don’t do this! Use a guide wire to carry the weight of the electrical cord and the bulbs especially in the wind and heat and prevent the cord from stretching or getting damaged. If you’re planning on placing the string lights over short distances, like a fence, between tree branches or a deck rail, no guide wire would be required.
Looking at each socket here, they are made with a heavy-duty tough plastic. It’s quite durable and can withstand being outdoors for a long time. In fact, let me give it a few hard cracks. The bulbs are also quite robust and would need to take quite the tumble to break. Let me give one a hit as well. The plastic is actually a little soft and absorbs the metal tool to prevent breakage. Nice! At the back of each socket there is also a loop to attach the bulbs to a mounting surface. Let’s look at a few ideas to help hang the lights. You could use a wire key chain. Let’s fast forward. A simple twist tie would work, or even a nail. A hook screwed into wood, or even a carabiner. Here is a zip tie and lastly a zip tie connected to an all-purpose Christmas light holder for shingles and gutters. You could even use these clips to hold the wires onto shingles or eaves. Links for these are in the description as well.
Here is a quick demo on replacing a spare. Simply unscrew the non-functional bulb and slide it out and replace it with the extra one provided. There are 4 contacts at the bottom of the bulb and a little tab so the bulb can only be inserted one way to ensure the contacts line up correctly.
At the end of the cord there is a connector for attaching additional strings of lights. The included adapter isn’t strong enough to power more than one set of 15 lights. You can connect additional strings but you will not achieve maximum brightness.
Alright folks, I can’t wait any longer, let’s get these plugged in and try them out. At this point, I have no control app installed on my phone and I’m plugging in the light for the first time. Just waiting here now a few seconds, still waiting. Oh cool, red, now white, now green, blue, purple. Cool, looks like we are just repeating the color sequence. Let’s push the controller button and move to the next sequence. Ok, we have a bunch of different colors, and yeah, cool they are all changing to a different color. I really like this one. These are just 2 of many included out-of-the-box scenes.
I’m having company over this evening for a fire. I have the perfect place to install the lights.
Here we are outside by the fireplace. I will install the lights on this privacy screen and it should add some nice ambiance to this setting.
Here we are getting the string straightened out. Now, I am wrapping them around the screen and making them nice and even looking.
Now that I have the fire lit, I think we are set, let’s plug them in. Time to go and sit by the fire and listen to it crackle while I relax for a minute. Let’s go back and try a few other scenarios. So, I think this one is my favorite.
So, what you saw so far was the pre-programed scenes and I’ve very impressed. Let’s download the Lumary app and take things to the next level. Also, just so you know, the pre-programed scenes accessible through the app as well.
![[ Sturdy Construction ] Our junction box is made of high-quality ABS plastic material, which offers excellent impact resistance and electrical insulation. Rest assured that your equipment will be well-protected in harsh environments. [ Safe and Certi...](https://m.media-amazon.com/images/I/31JwSescO0L._SL160_.jpg)


LeMotech ABS Plastic Dustproof Waterproof IP65 Junction Box Universal Electrical Project Enclosure White 7.8 x 6.1 x 3.1 inch (200 x 155 x 80 mm)
$13.99Let’s say it’s St. Paddy’s Day and we want all green. For constant colors, go to the light bulb icon and with the paint bucked selected, we’ll drag the color selector and the light will change to the selected color. Let’s make it green. To make it a brighter or deeper green, slide the brightness. That’s it. Pretty easy! To change the color of individual bulbs, use the scribble icon, select the color, then the bulb. Let’s update a few here. Now to turn a bulb off, use the eraser icon and the select the bulb. By the way, I hoped you noticed, there is little to no lag here, which I’m also pretty excited about.
To take things up a notch, select the pallet at the bottom of the screen to enter the scene page. To use a default scene or scenario, simply click on it. If you like the style and you want to modify it, click the 3 little dots. I’ll enter the configuration for chase. Here you can add and delete the colors you want to chase. I’ll use red and green for Christmas. I’ll update the green. Let’s preview it using the preview button. Let’s make the colors a little deeper. I’ll increase the speed. Now we’ll click ‘save as’ and call it Christmas. You can see it’s been added to the list as a DIY scene.
I also like the scene called breathing. Let’s make one for Halloween. Pick my colors. Crank up the speed. Change the brightness of the purple. I like it, so let’s save it.
Moving onto the music icon here at the bottom. These are 3 preselected colors that will dance to music on your mobile device. I’m playing music here from Amazon on their app, and the lights are reacting to the music. Due to copyrights, I cannot play the music for you but, that’s what’s happening here.
Game is very similar but romantic just uses white and red to mimic the beat.
Last thing on the app, if you click the pencil icon, there are a few more options in here, including some pretty straight forward instructions on controlling the lights with you Amazon or Google devices.
On the back deck here, I strung the lights along the rail and then up each post. Again, this is just temporary and would need to be secured if these were going to be here long-term. Here we are at night with a quick look at their brightness and how they create a different atmosphere to the sitting area. Pretty cool. Oh yeah, and the temperature is below freezing and these lights are having no issues. Funny enough, while I was testing these lights, I had a surprise visitor.
Here is a different install of the light on the deck again just installed with clips along the edge of the soffit. Here we are at night, again an impressive addition to my sitting area. I might have to pick up a second set of lights for just this area alone. These are the same clips, by the way, I use to put Christmas lights on my house. I’ll add the link for these too below.


Adams Christmas 9040-22-9553 All Purpose Light Holder, 500-Pack
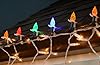
$35.95Moving along to the front of the house, I have already installed the light on my fence and activated the chase scene. I hung them so the lights are at the bottom on each plank and therefore visible from both sides. Awesome!
Range test: And here way back near the end of my property, we have the lights strung through 3 trees. Notice I placed the controller box up in the tree a little way because this location will be our range test. Yes, I measured it out and we are 185 feet or 56m from my house and my wireless access point is actually in my basement so if I add on that rough extra distance, that would bring us just over 200ft. When I enter in to control the lights, I see a ‘weak Wifi’ message. Pause if you want to give it a read. I am still able to control the lights with little to no lag.
Here at 280ft, or 85m. I can still connect but there is a lag here as I change to colors. I think I might be pushing my luck here at this distance.
Water test: We have 1 more very quick test to perform. The water test. Here we are at night at it’s almost freezing out. After a minute of a heaving soaking, the lights are still working just fine.
Alright guys, I’ve spent a lot of time testing these lights to make sure my review was as accurate as possible. Lumary has created a top-quality product here and I am more than impressed with how versatile these are in adding a fun mood or ambiance to my outdoor settings. In summary, I would like to see a weatherproof plug down the road and I feel the bulbs and wiring and sockets are all great quality. The button on the controller box is also a great idea for selecting scenes for when you don’t have the app set up. And lastly, the app is awesome, very simple and easy to use. For me, it’s definitely worth the price tag and I look forward to using these lights around my yard to add a customized and enjoyable setting. Links for everything seen here today are in the description below. Let me know if you found this video helpful with a thumbs up and please consider subscribing for more home tech DIY projects you can do yourself.