Hey Guys,
Today we are checking out a very special camera. I’ve been eyeing this one for a very long time and is now, the most expensive camera I have presented on this channel. Let’s check out the specs, set it up to record on my Network Video Recorder and PC using BlueIris. We’ll also check out the daytime and nighttime video quality and see if it’s worth $868.00 US.
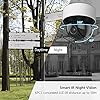
This is Hikvision’s DS-2DE4A425IW-DE 4MP speed dome security camera boasting a 25x optical zoom and ultra-low light sensor. The price ranges from about $600US to almost $900. You may be thinking, well, geeezzzeee, that’s expensive for a 4MP camera… but it’s going to boil down to the quality of the sensor and any bonus features this device can offer.
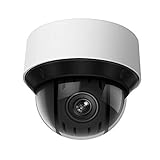
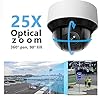


4MP PTZ PoE IP Dome Camera OEM DS-2DE4A425IW-DE, Outdoor PTZ DarkFighter Speed Dome Camera with 25x Optical Zoom, 360°Pan & 90°Til,4.8~120mm Lens,165ft Night Vision,Audio&Alarm I/O,WDR,MicroSD 256GB
$409.00


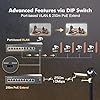


MokerLink 8 Port PoE Switch with 2 Gigabit Uplink, 802.3af/at PoE+ 100Mbps, 120W Built-in Power, Extend to 250Meter, Metal Plug & Play


NVR, 16-CHANNEL, H264+/H264/H265, UP TO 12MP, INTEGRATED 16-PORT POE, HDMI, 2-SATA, NO HDD
So where would you install this camera? It’s probably not very practical for a neighborhood where the houses are close together. I’m thinking more for a spaced-out area where you can take advantage of the 25x zoom; at least 200ft (60m). Somewhere that you need a solid image in low-light and possibly somewhere where you have multiple areas of interest. Parking lots are an obvious location, around warehouses, businesses or around high traffic areas such as townhouses, marketplaces, airports, groceries stores, golf courses and so on. Maybe acreages or farmland to keep an eye on animals.
You’re also going to want to install this one pretty high. I would recommend, at least 10ft. 25ft would be ideal since you don’t want anyone to steal the camera.
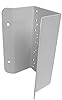
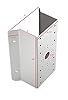
I’ll attach the included mounting plate to this bracket. Front is indicated on both pieces of hardware. I’ll connect the fall-prevention line and then secure the camera to the bracket. Once outside I connect the network cable and install the camera to my temporary location, overlooking my driveway.
I have already downloaded and installed the Hikvision camera management tool called SADP. When I open the tool, I can see the camera which requires activation. This is done by giving the device a password. Now I’ll update the IP address to match my subnet of 192.168.0.X. If I open my browser, I can now access the camera’s web user interface and all the configurations.
For the first time, you may need to download an executable which allows the browser to use the live view feature of this camera.

![[Older Version] SanDisk 128GB Ultra MicroSDXC UHS-I Memory Card with Adapter - 100MB/s, C10, U1, Full HD, A1, Micro SD Card - SDSQUAR-128G-GN6MA #1](https://m.media-amazon.com/images/I/41FwW1I45rL._SL100_.jpg)
![[Older Version] SanDisk 128GB Ultra MicroSDXC UHS-I Memory Card with Adapter - 100MB/s, C10, U1, Full HD, A1, Micro SD Card - SDSQUAR-128G-GN6MA #2](https://m.media-amazon.com/images/I/41A8MQKLuEL._SL100_.jpg)
![[Older Version] SanDisk 128GB Ultra MicroSDXC UHS-I Memory Card with Adapter - 100MB/s, C10, U1, Full HD, A1, Micro SD Card - SDSQUAR-128G-GN6MA #3](https://m.media-amazon.com/images/I/411mXHWX8aL._SL100_.jpg)
[Older Version] SanDisk 128GB Ultra MicroSDXC UHS-I Memory Card with Adapter - 100MB/s, C10, U1, Full HD, A1, Micro SD Card - SDSQUAR-128G-GN6MA
This is wider than I expected. You can use the PTZ arrows in the upper right to control the direction in which the camera is pointing. There are also zoom buttons for getting a closeup shot. The movements are very responsive and the image is great. It’s a little blotchy at times and the focus does take a few seconds.
Jumping back into the user interface, I’ll update my timezone. Next, I’ll change the video quality to highest. On the storage page, I can format the SD card and set the camera up to record continuously. To playback footage, go to the Playback tab. Using this feature means this camera will work as a standalone device and no PVR or Network Video Recorder is required.
Since I am using a dedicated PC to record all my cameras’ footage, let’s jump into Blue Iris and add this camera. I’ll edit this channel placeholder by going to its properties. On the video tab, update the IP address, credentials and select the correct model of camera from the dropdowns. And that’s it.
Next is the license plate test. My fence is 75 feet or 23 meters away. It’s not until I’m 50 feet away that the plate can be read. At night, the IR lights can reach me as you can see by it reflecting on the license plate. Considering it’s totally dark out, not a bad image at all. Let’s do one more nighttime test but using the 1 second shutter. It looks like daytime but it’s actually completely dark out. As I approach, I’m very blurry so this feature won’t work well for viewing anything moving.
Let’s test out the zoom. I place the plate at the end of the drive, over 75 feet away. When I zoom into 25X, the camera takes a few seconds to focus and doesn’t get a sharp image once it’s done focusing. At night, the reflective surface prevents you from reading it and the focus is even more challenging for the camera. Using the slow 1 second shutter, the zoom and focus are very slow. In fact, it took 10 minutes for the camera to focus and it missing the correct focus. It seems like the camera analyses each frame after each second making it very slow compared to up 30 times per second. I wish there were more shutter options leading up to 1 second.
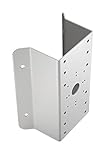

Kenuco cm DS-1276ZJ Universal Corner Bracket Most Hikvision Wall Mounts Cameras (White 1-pk)
$34.99Let’s turn on the Smart Tracking and see how well the camera can follow me around. As I enter the driveway, the camera picks me up and zooms in and the plate is easily readable. Very impressive speed and it keeps with me as I walk around. I really like this feature. When a car drives down the street, it picks it up no problem. About 10% of the time, the camera would pick up an object, like this truck and once it was out of frame, the camera would continue to hunt for it… sometimes for up to 5 minutes. I’m a little surprised that issue wasn’t picked up by Hikvision before releasing the latest firmware. At night, the camera’s tracker was able to find me and stay with me as I walk around the property. I was able to outsmart the tracker in the trees and it quickly gave up. With the long shutter on, the tracking did not work at all.
Here is a quick look from another camera of the IR lights from the speed dome moving across the property.
I’m kind of nervous doing this, but let’s spray water on this every expensive piece of hardware. The camera’s tracker seems to be getting confusing with the water drops but there were no issues with water getting inside proving it’s weatherproof. It also performed well in the -20 degrees Celsius (-4 Fahrenheit).
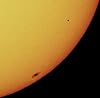
Let’s check out the sun. I have a sunshield which I used for my telescope and I’ll use it to protect my security camera. The detail isn’t telescope quality but not bad. And a time-lapse.
Auto Amazon Links: No products found.
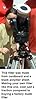
For the next test, I’ve wall-mounted the camera here pointing towards the north in hopes of seeing stars and maybe some northern lights. Within an hour, using the slow shutter, I was able to see some dim auroras. The stars also look awesome. Here is another time-lapse. When I pointed the camera straight up in another location, you could see things among the stars flying by. Zooming in on stars was a challenge since the camera’s zoom and focus are very slow when using the 1 second shutter. The autofocus wouldn’t work on the stars at all and trying to get a good manual focus with a high zoom was almost impossible. It took about 30 minutes to get this picture on the Hikvision iVMS app of what appears to be the Andromeda galaxy. I did also find a deer in my yard that evening.
Lastly, let’s look at how to all this camera to my Hikvision NVR. The camera has been reset and in a status of Inactive, just like when I purchased it. I’ll plug it into a free channel on the NVR. After about a minute, the camera is activated on to its own network and given the NVR’s pre-configured password. To use the PTZ functions, scroll the mouse to zoom and drag the image to pan and tilt.
In summary, I do like the camera, but do I $868 like it…? well, not as a home owner. It’s overkill for a residence unless you have tons of space. For townhouses, hotels, business and parking lots, yes, this camera is definitely the way to go. I hope we’ll be seeing a firmware update for the PTZ tracking issue (where it searches for objects after they leave the frame) and maybe one for the painfully slow zoom and focus with the long shutter. In the meanwhile, daytime and nighttime quality are very good, and checking out the sun and stars was a little extra treat.
Thanks for letting me share my experience with you on this camera. I hope you found this information helpful, if so, please like and subscribe to me on YouTube!